
Wednesday, December 8, 2010
Batik
Wednesday, December 1, 2010
Wire Sculpture as a 2nd Language Learner

Monday, November 22, 2010
African Masks

Creating a mask from a milk jug was an incredibly fun project. I wanted my mask to have character and be fun at the same time. I decided to paint it bright and gave it a nose using the handle of the jug. The hair reminds me of pebbles and luckily stick straight up. I had so so much fun with this project and I would wear this mask anytime.
Map themed Project

Google Sketch Up
In class we learned how to use Google Sketch Up. It is one amazing program! So very useful and I can see that there are many professions that could benefit from it. We had to create a building using various architectural items like columns. While I had a really difficult time with the program I was mostly pleased with the end result. The best part of the project was being able to decorate with the items in the program.

Scratch Board


Petroglyphs

We got to create some fun petroglyphs in class using yarn, glue and cardboard. It was such a fun idea although choosing what symbols would represent you was a tough one. I however chose to do (from right to left then down), dots, that represent to me, chocolate chips because i LOVE chocolate chip cookies. I also tried to make a sun with rays although it looks more like a creature with three feet. Finally I did a pair of glasses because most of my life I have had to have glasses/contacts. Creating the symbols was a great exercise in thinking about one's life and what the symbols mean to you.
Watercolor Resist

When we did the watercolor resist we had to do it as though we were looking out our window. I chose to use my bedroom window from my house in Buhl, ID. From that window is a view I have memorized over the years. It is one of my favorite views to see in this world. I see trees, and not just a couple like this shows but TONS of trees. I can see our rock wall, and then I can see forever starting with our neighbors pastures. It is a place that has defined me and the view from the window has had a huge role in that.
Monday, November 15, 2010
African Masks
http://www.artyfactory.com/africanmasks/masks/baule.htm

Book "African Sculpture Speaks" - A systematic style guide analyzes the characteristic features of the different styles of tribal sculpture, and a special chapter for the collector tells how to buy and care for African art. Segy also discusses the styles of the main sculpture-producing tribes in East and South Africa.
Art and Life of Africa - CD-Rom University of Iowa
New! African Masks: Burkina Faso - DVD by Christopher Roy
African Art Techniques: Wood, Cloth, Metal, Clay
Teacher made PowerPoint of mask images -- and/or slides (St. Louis Museum of Art has an excellent introduction to African Art with cassette tape) - Numerous prints
Playful Performers - Why Wear a Mask? - National Museum of African Art in Washington, D.C. - online exhibit to bring to young people an enhanced understanding of the many roles that masks play in various African societies and cultures. Must see!
Masks from Many Cultures - Crystal Production Video
See African Masks- Site gives a nice overview of styles, materials used and reasons for masks of Africa - shows a few examples (graphics not photos- but still good enough for students to get the idea) -- and there is a short quiz. The hands on project is a positive/negative space design (one exactly like I did with 6th graders and 3rd graders)
Kanika African Sculpture - See African inspired masks by Kanika Marshall
African Masks
The Materials of an African Mask
African masks are made from different materials: wood, bronze, brass, copper, ivory, terra cotta and glazed pottery, raffia and textiles. They are often decorated with cowrie shells, coloured beads, bone, animal skins and vegetable fibre.
However, the majority of masks and sculptures are made of wood for two reasons:
1. Trees are in plentiful supply in the forest.
2. The carver believes that the tree has a spiritual soul and its wood is the most natural home for the spirit in the mask.
Before it is cut down, a sacrifice may be offered as a mark of respect to the spirit of the tree requesting its permission for the carving. Its life is governed by the same natural and supernatural forces that inspire the artist and his community. This type of ritual is common to many cultures that have a close spiritual bond with nature.
Wooden masks are often coloured with natural dyes and pigments created from vegetables, plants, seeds, tree bark, soil and insects. Occasionally they are splashed with sacrificial blood to increase their spiritual power.
The tools used to make a carving - traditionally the Adze - are also endowed with their own particular spirits. When tools are passed down through different generations, they sometimes inherit the spirit and skills of their previous owners. They, like the artist, his carving, and the tree from which it came, are all part of that 'oneness' of nature - the ecological vision that informs all African tribal culture.

Objectives:
1. Compare and contrast various forms of artistic expression associated with specific groups of people, geographic regions, or time periods.
2. Investigate processes and beliefs used by various cultures and institutions, past and present, to create works of art -- Describe how artists use materials, tools, images, and ideas to create works of art.
3. Speculate about a work of art, i.e. who made it; what materials, techniques and skills were used; its intended purpose/audience; and how it was used -- Discover how an object is similar in function but different in structure due to who made it, materials used, and how and when it was made -- Identify the cultural clues found within arts forms and events -- Compare and discuss works of art based on similar sources of inspiration.
4. Control a variety of materials (clay, mixed media), tools techniques and processes while creating works of art -- Recognize how technical elements affect works of art. Explore texture and draped slab method of construction. Try additive and subtractive sculptural techniques.
5. Connect ides, materials, processes and techniques while creating works of art -- Assess, revise or adjust art products through a reflective process --Integrate planning
6. Discover how a group's beliefs and values are reflected in its art forms and stylistic choices
Materials:
Mask handouts, 9 x12 Newsprint (some may want longer paper for horns), Pencils
 , Scissors, Clay
 (self hardening clay may be used, too), Newspapers, Canvas, Guide sticks, Rolling Pin
 , slip dishes, Clay, Clay Tools, Clay Needle Tool, Fettling Knives, texture gadgets (old Play-Dough tools are great), stamps, various Texture Tools, wood/Masonite boards, moist paper towels, plastic bags
For finishing:
Acrylic Paint (brown, black and assorted colors), Paint Markers , Brushes, water dishes,
wire for hanging (old telephone wire works great), jute, Assorted Yarn, Assorted Beads, gems, natural stones, shells, raffia, horsehair, boas, natural seed pods, and other nature things...moss, feathers, etc - Be creative! Tacky Glue, Glue Gun, Glue Gun Glue Sticks
Resources:wire for hanging (old telephone wire works great), jute, Assorted Yarn,
Book "African Sculpture Speaks"
Art and Life of Africa - CD-Rom University of Iowa
New! African Masks: Burkina Faso
African Art Techniques: Wood, Cloth, Metal, Clay
Teacher made PowerPoint of mask images -- and/or slides (St. Louis Museum of Art has an excellent introduction to African Art with cassette tape) - Numerous prints
Playful Performers - Why Wear a Mask? - National Museum of African Art in Washington, D.C. - online exhibit to bring to young people an enhanced understanding of the many roles that masks play in various African societies and cultures. Must see!
Masks from Many Cultures - Crystal Production Video
See African Masks- Site gives a nice overview of styles, materials used and reasons for masks of Africa - shows a few examples (graphics not photos- but still good enough for students to get the idea) -- and there is a short quiz. The hands on project is a positive/negative space design (one exactly like I did with 6th graders and 3rd graders)
Kanika African Sculpture - See African inspired masks by Kanika Marshall
Friday, November 5, 2010
Technology in Art Education
Art education in today’s schools, as with nearly every other subject can now be expounded upon, taught and experimented with thanks to technology. There are numerous programs and ways to use technology in teaching students about different aspects and ideas about art. “ Using technology to demonstrate teaching and learning is the best way for educators to prove that they are using technology to enhance teaching and learning” (Olejarz). This is extremely true for art educators because the technology is not a ‘lazy’ way of doing art but is instead enhancing what they can teach their students and what the students will learn. For instance, according to Emphasis Art a great way to incorporate technology into teaching art is through, “using computers to learn about symmetry, scaling and proportion” (p. 118). On the National Council on teaching Mathematics web page, there is something called the ‘Patch Tool” which can be used to make quilt type designs. An art teacher could use this program to teach students about shapes as well as math using computers. A great way to teach students about 3 dimensional shapes as well as lines, colors and different architectural eras would be through the program Google SketchUp. With this program students use the computer program and can create numerous designs. Another wonderful way to use technology in art education is with digital photography. Some schools will loan cameras out to the instructor or for students to use. By using digital photography, the students will also get to learn about photography techniques, how to edit pictures and about art critique. An activity like this for instance, would be great for fifth grade art students. It is age appropriate since most students this age already know how to use digital cameras and they are more likely to understand the use of the camera as well as to be careful with it. The art principles that could be taught to them could be the rule of thirds as well as how to create focal points in pieces of art. Another great piece of technology that could be used in art education is of course, the internet. There are countless programs on the web that can help teach color, shape, the color wheel, videos on how to use oil pastels or charcoal etc. Students, by watching videos can gain another perspective on how to do a certain technique while they can also do interactive art activities online. For instance, there are online activities where the students can practice putting together random shapes and colors to create a Matisse like product. The use of technology in art education is best stated in a quote by Stephanie Reese, “I don’t think technology is replacing traditional art instruction, but I think it’s a really good piece to use alongside it. …It’s really a skill they need to go on and be competitive with the rest of the world."
Clements, Robert D., and Frank Wachowiak. Emphasis Art: A Qualitative Art Program for Elementary and Middle Schools. 9th ed. San Francisco: Allyn & Bacon, 2010. 52-56. Print.
Devaney, Laura. "Technology makes art education a bigger draw." eSchoolNews. N.p., 19 Sept. 2008. Web. 5 Nov. 2010. <http://www.eschoolnews.com/2008/09/19/technology-makes-art-education-a-bigger-draw/>.
Olejarz, Harold. N.p., n.d. Web. 5 Nov. 2010. <http://www.olejarz.com/arted/>.
Friday, October 29, 2010
Age Appropriate Lessons
Age appropriate lessons are important to have especially in the art education classroom. If students are given a lesson with techniques they cannot yet do or do not understand, they will most likely become frustrated or give up when they can't get it. Instructors should want students to succeed in what they are doing and can ensure this by teaching lessons that are age appropriate.
The following lesson is a 4th grade lesson. This particular lesson is age appropriate for a couple of reasons. First, 4th grade students are older and usually will find a lesson about a certain artist more interesting and understandable than say a 1st grade class. As for symbols and using pastels, these are also techniques that 4th grade students can handle as they are getting to the point of being able to interpret symbols in other classes like history classes. The lesson will also span two to three days and 4th grade students are able to succeed in this kind of lesson plan as they can handle lessons that are longer and more time intense. This lesson would not be suitable for any grades younger than 4th grade simply because it is a bit more complex as are the techniques used with the pastels and glue.
Getting personal with Marc Chagall Grade: 4th
Description: Students will create a Chagall like picture with personal meaning in two classes
Materials Needed:
-scrap paper, at least 8.5" x 11"
-12" x 18" black construction paper
-pencils
-glue
-oil pastels (Cray-Pas are great)
-toothpicks/skewers for -scratching
-tissues for blending
Objectives:
-Students will understand the meanings of surrealism, symbolic and Marc Chagall. ©
-Students will create a piece of art from personal subject matter that has unity. (P)
- Students will practice oil pastel techniques. (P)
-Students will understand how to look at art, what to look for and how to talk about it. Will critique their own pieces. (A)
Standards Addressed:
-Implied Texture: Create visual texture
-Art Criticism: Use artist’s images to look at art, what to look for, how to talk about it.
-Examine how visual artists create the illusion of textures in their art.
-Unity: Elements in work look like they belong together.
-Further develop observational skills by adding structural lines and line designs to show self-expression in the interior features of objects.
Teacher Resources:
-Works by Marc Chagall
Pedagogy:
1. Display works by Chagall ("I And The Village", "Birthday", "Time Is A River without Banks") and lead the class in a discussion. Ask the students to describe what they see, which elements are realistic, and which could only happen in a dream. Have students find similarities between artworks.
2. Ask students to interpret what they see, noting that Chagall preferred not to explain his works in depth, so that many of them are mysterious.
3. Tell students that they will be illustrating a story from their life. Ask them to choose an event that has already happened to them or that they would like to happen in the future. Brainstorm possibilities, such as:
-moving to or from a town
-future careers
-favorite activities
-death of a loved one
-divorce
-baby stories (this always gets a huge response)
Remind students that the subject matter can be happy or sad, but it needs to be personal. Some will find this difficult, so be very careful with comments and critiques.
4. Ask students to sketch their idea onto the scrap paper. Refer to Chagall's works-he painted objects floating around, upside down, etc. Not a strictly realistic drawing, but should have a focal point, preferably in the middle of the page. If not in center, need to use other visual devices to lead our eyes to the most important part.
5. It’s a symbolic picture, and it doesn't necessarily have to make perfect sense to the viewer as long as it tells the story.
6. When students have an acceptable sketch, copy their idea onto the black paper, noting that their pencil lines will not show up quite as well, nor erase well, so they should work carefully.
7. Next, students trace their pencil lines with glue. The glue should dry clear, allowing the black paper to show through, giving the picture a stained-glass effect. There are some tricks to this, and I have found that the Crayola glue in the no-clog bottles (the ones with the strange lid) dries especially clear. You may also want to try black colored glue. When tracing small or detailed objects, have students trace only the outermost contours.
8. When the glue dry, have students begin coloring with oil pastels. Oil pastels look best when colored heavily, although coloring lightly and rubbing with a tissue can create a lovely background. Encourage them to blend colors, even in strange combinations, as it can have a really neat effect. The focal point should generally receive the brightest, richest coloring effects, but definitely not always.
9. Some other techniques to try are patterning (lay down a background color, then draw lines or dots on top; my students' favorite is a dense loop-de-loop), smearing, and scratching (lay down a heavy color/colors, then use a toothpick to scratch lines or details).
Assessment:
Formative: As students work, discuss what the personal subject matter is, and what symbols are being used to represent. Discuss with students one on one as they work, how they are using pastels to create textures.
Summative: Rubric with 1-5 scale based on 4 areas.
-Did student use symbols to communicate meaning of personal subject matter?
-Did student experiment with surrealistic style?
-Is there clear focal point?
- Did students use at least one texture within piece?
Adaptations/Integrations/Accommodations:
-Can integrate with language arts by having students write poem or haiku about their picture.
Friday, October 22, 2010
Arts and Crafts.
So what are these differences? And is there a more important one within the elementary art curriculum? Well to start off one must understand the difference between the two. “A craft is usually a cookie-cutter or close-ended activity…based on a formula or recipe and all participants follow the same directions and end up with roughly the same result every time” ( Rayme). Crafts then are more like projects that everyone can do by following steps or a recipe and there is often not much variation to the end result no matter who is doing it. A craft for instance that is common in elementary schools is to make a certain ornament around Christmas time. The teacher or room helper will pass out the same materials to each child and then guide the children step by step in what to do, this results in the children all ending up with say a popsicle stick snowman ornament for their tree. Something that is considered a craft however, does not mean that it is any better than a piece of art or vice versa. “With a craft, the individual is de-emphasized, and the focus is the quality of the product…Craft emphasizes the incremental and long-term” (Hadkins). “Often, if the skill is being used in a common…way, people will consider it a craft…on the other hand, crafts and design are sometimes considered applied art.” (ART).
When it comes to art, the definition is quite different, “An art activity is more open-ended, meaning the end product is not always going to be the same” (Rayme). “Art emphasizes the role of the person and uniqueness of the object produced” (Hadkins). For instance, in a given classroom a teacher could instruct students on how to use pastels, a technique, give them the same materials, paper, etc., and ask them to draw a picture that represents them. The results, while similar due to the medium, will surely be extremely different and original based on each child’s perspective. “Art creates an expression or original statement in a meaningful and enduring way” (Rayme).
While the two are different ways to create, is there one that is more important? I believe that there is only a slight difference. Crafts are a great way to get a child’s mind to understand certain techniques that they will need to know all their life, for instance cutting and pasting which is common in crafts. I think that crafts should be implemented at least once in a while in the classroom because they give the children opportunities to produce a great piece and again just have some simple fun in the creation process. However, creating art is slightly more important because art projects will provide the child with numerous opportunities and items they will use throughout life. While creating art projects, children learn to think critically, use their imagination, understand how to express themselves, etc. Children will more likely understand and implement these and other concepts throughout the rest of their life if they get to learn them in a fun environment such as an art project where they got to create something special, unique and different.
"ART." Wikipedia. N.p., n.d. Web. 22 Oct. 2010.
<http://en.wikipedia.org/wiki/Art#Classification_disputes>.
Hadkins, Evan. "My Father's Work." Compelling Resource. N.p., 23 Feb. 2010. Web. 22
Oct. 2010. <http://counsellingresource.com/features/2010/02/23/art-and-craft/>.
Rayme, Mary. "Art vs. Craft." Suite101.com. N.p., 13 Oct. 2010. www.google.com. Web. 22 Oct. 2010.
<http://www.suite101.com/content/art-vs-craft-a296484>.
Thursday, October 14, 2010
Motivation
Motivation for everyone is different especially depending on what the class, task or item is. Motivation for me comes in many different forms depending on what I am doing. For instance, in college and with classes and school, my main motivation comes from my own personal want to learn. I believe that knowledge is one of the most important things we can acquire and if I had all the time and money in the world I would take countless classes. Wanting to learn and know more about various subjects is definitely a huge motivator. Another large part of my motivation comes from wanting to be a good teacher and help others in the world. The reason I am becoming a teacher is because I want to teach children. I think too often children are not given the attention and respect they deserve and I am so motivated by my want to teach them and give them what they deserve. Wanting my parents, family and friends to be proud of me is another thing that motivates me as a learner, which is what motivates many learners. When times get tough whether it's having trouble with a concept or simply being tired of school, what keeps me going is knowing that I want to make my parents proud. I want to graduate and be able to have them be proud of their daughter who graduated college. There are often other reasons I stay motivated as a learner but these are surely the top reasons which I am sure are the same for many.
As for my future students, I am certain they will be motivated by similar reasons, however at the Elementary age level the reasons can often be different. For instance, many students in elementary grades are motivated by their need for approval and to be praised. Any child in school will automatically get a pleased look on their face when a teacher or parent says they have done a good job or they are proud of them. There again, no matter how young the child, they want their parents to be happy and proud of them. Sometimes another aspect that can motivate learners at those ages is wanting to keep up and be accepted by their classmates. Students, especially in today's society, want more than anything to fit in and be accepted. If s an instructor it will be my job to make sure that students stay motivated but try to gear them in the right direction for being motivated. An example of this being that I want my students to be motivated to learn because they love learning. If students start to enjoy learning at a young age they will be more likely to carry that on throughout their life.
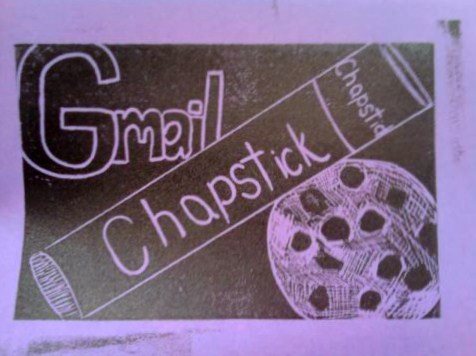
It's about what you taste

Visual Culture
Visual culture is all around us and changes every day. Thinking of my current visual culture, things I see every day I came up with a couple of ideas I wanted to incorporate. Chapstick because I use it every day as well as Gmail because I check my email more than once every day. These two things are a huge part of who I am currently and my visual culture. The other object I chose to use was a chocolate chip cookie because cookies are my favorite treat and have been a large part of what I see for years. The interesting part of making this print came from having to get texture on the print. I tried cross-hatching to give the cookie more shape. Overall, I probably would have changed it to only use one or two objects but I think it represents my visual culture well.

Friday, October 8, 2010
Teaching children to write Artist Statements
While the majority of focus in art classrooms is just having children learn concepts and how to create certain types of art, it is equally important that they learn to develop artist statements to accompany their work. When teaching children of various ages to write artist statements for their work, the instructor should first begin by teaching them why artist statements are important to develop. “ An Artist’s Statement provides valuable insight for artists into their own work and process…it can help make their ideas more cohesive, give greater self-confidence…fulfills a vital role as an evaluation and monitoring exercise for the artist to assess their own work”(Jeffs). If children understand why artist statements are helpful, they will be more willing to put real work into writing them. Artist statements also help the artist communicate the language of their art to those viewing it (Bamberger). The next aspect of writing an artist’s statement that should be taught is that, “There is no one right answer on how to write an Artist Statement” (Jeffs). Students should know that they cannot write a wrong artist’s statement as it is a personal piece of writing (Gordon).
Before students begin to write their artist statements, there are a few guidelines that if given, will help them to create a more professional piece that can better convey what they are trying to do. Firstly and one of the most important things to remember is to,
“Write your statement in language that anyone can understand…not that you or your friends understand. An effective statement reaches out and welcomes people to your art, no matter how little or how much they know about art to begin with; it never excludes” (Bamberger). The artist must always remember to write their statement in the first person, using “I” voice. It also helps to use the present tense. Another guideline is that it is better if the artist statement is brief no more than a page in length (Jeffs). Once beginning to write the statement, remind students to, “Keep your sentences authentic and direct” (Gordon).
Then it’s time to instruct the students on actually writing their statement. If they don’t really know what to write, the following questions and statements can help them out. Have them write on, “Why you make your art, how you make it, what it’s made out of, and what it means to you” (Bamberger). Bamberger also states that it should “hook…like a really good story is about to be told” as well as, “connect what your art expresses with the medium you’re expressing it in. For example if your art is about world piece, and consists of twigs protruding from pieces of clay, explain the connection”. Finally, there are various options for younger children when constructing artist statements. Teachers can simply have them fill out a short worksheet with questions and use that as an artist’s statement until they can develop them on their own.
Questions that work wonderfully for worksheets and other methods of writing statements for younger students follow:
-What is your favorite tool? Why
-What is your favorite material? Why?
-What do you like best about what you do?
-What do you mean when you say that a piece has turned out really well?
-What patterns emerge in your work? Is there a pattern in the way you select materials? In the way you use color, texture or light?
-What do you do differently from the way you were taught? Why?
-What is your favorite color? List three qualities of the color. Consider that these qualities apply to your work.
-Write five sentences that tell the truth about your connection to your work. If you are stuck, start by filling in the blanks below.
When I work with __________ I am reminded that ___________.
I begin a piece by ______________.
I know a piece is done when __________________.
When my work is going well, I am filled with a sense of _____________.
When people see my work, I'd like them to ________________.
Bamberger, Alan. "Your Artist Statement: Explaining the Unexplainable." Art Business.com. N.p., n.d. Web. 8 Oct. 2010.
Gordon, Molly. "How to Write an Artist's Statement with Creativity and Integrity ." creativity portal. N.p., n.d. Web. 8 Oct. 2010.
Jeffs, Cherry. "How to Write an Artist's Statement." suite101.com. N.p., 9 Mar. 2010. Web. 8 Oct. 2010..
Jeffs, Cherry. "How to Write an Artist's Statement." suite101.com. N.p., 9 Mar. 2010. Web. 8 Oct. 2010.
Monday, October 4, 2010
A Bug's Life: Starring Gus


Creating Bamboo

Learning to paint bamboo with the same style used in Asian cultures was a fascinating project. As we learned to hold the brush a certain way and the 3 different strokes to use, I began to realize how precious similar works I have seen before are. I didn't realize how much work goes into creating certain pieces. Perhaps I only found it difficult because I am accustomed to using the 'common' styles and holding it like a pencil, but the more I practiced, the more my appreciation grew. While my piece, that I put my chop on was not my favorite, I did end up with a piece I loved (will post later) once I got the hang of the swift light movements of the brush. However it was great to see how such simple movements can create such realistic looking plants As for the chop we made to mark our work, I loved the idea of how it's used. It took a lot of creativity to fit my name in a little square but once it was done I loved how it looked and the purpose of having it. This is the type of project I can surely see myself incorporating in my life as a teacher for I feel it teaches us valuable lessons about appreciating and the importance of learning about art in various cultures.
Friday, September 24, 2010
Assessment Strategies
While art education provides students with wonderful opportunities for creativity and lessons in life, another large part of art education that will assist them in life is the assessment portion. “The primary purpose of assessment is to determine students' achievement of the Arts expectations; however, this same information can also be used to determine the effectiveness of prograams and teaching methods to enable all students to achieve to the best of their abilities” (Assessment in Visual Arts). While the assessments help the teacher, students learn how to assess other aspects of their lives, other subjects in school and learn the best ways to do this. There are two types of assessments that should be used, summative and formative. Examples that can be used in the classroom are listed below.
There are summative assessments that should be used within the art education program. These types of assessment are used to, “diagnose, revise curricula and determine if objectives have been met” (Clements). For instance, one can give the children a questionnaire to fill out with questions like “what was good about art this year? What did you learn this year about how to make art?, Do you have ideas to make art class better?”(Clements). Another way to use summative assessment is by having the students create portfolios that they turn in at the end of the year. “The portfolio is a great way to illustrate improvement over time” (Assessment). When the student hands in the portfolio, the instructor can then grade all the final products that have been worked on throughout the course. Rubrics are also a good type of summative assessment. In art, often people define art differently. “ The best way to take the subjectivity away is to have a rubric that explains in detail the amount of proficiency there must be for each aspect of the assignment”(Assessment). It works even better if the instructor works to involve the students in creating the rubric so that each of their perspectives on what should be assessed is taken into account.
As for formative assessments, these types of assessments are used to help students throughout the process of creating their art. They should be, “conducted as students form their art pieces and form their thoughts during art discussions” (Clements). A great way to assess student’s interest and skill throughout the different art projects and processes is with the use of a visual journal/sketchbook. “This is a great way for students to reflect on current projects...notes or thoughts can be written or drawn” (Assessment in Visual Arts). By allowing them to have a more private space, the instructor can get a feel as to how the student is doing with certain tasks, feeling about a certain project, especially if they tend to be quiet on the one to one level. These can be assessed with, “a tally sheet showing the regularity or as a means of checking the development of ideas for a project” (Assessment in Visual Arts). One great way to do a formative assessment is through having the students do demonstrations for whatever skill or project is being worked on. As they demonstrate for others, whether the class, or in small groups, the instructor will be able to see their progress on certain skills and lessons (Assessment in Visual Arts). While the above are great ways of assessing the student, the best way is to watch and talk to them about the project they are working on. By having a ‘conference’ with them, the instructor can discuss their self-assessment by asking if, “they are happy with it so far or what do they feel like changing?” As the instructor, they can simply give open ended questions and suggestions that will lead the student to assess their works based on the criteria and help them as they progress with a certain skill or project (Assessment in Visual Arts).
" Incredible @rt Department. Ed. Ken Rohrer. incredibleart.org, 2010. Web. 24 Sept. 2010. <http://www.princetonol.com/groups/iad/links/toolbox/assessment.html>.
"Assessment in the Visual Arts." Art Ed Resources. N.p., n.d. Web. 24 Sept. 2010. <http://home.oise.utoronto.ca/~hinwood/art_assessment.htm>.
It is of special importance that equal ROM ABOE
Clements, Robert D., and Frank Wachowiak. Emphasis Art: A Qualitative Art Program for Elementary and Middle Schools. 9th ed. San Francisco: Allyn & Bacon, 2010. 52-56. Print.
Subscribe to:
Posts (Atom)
